Tuesday, March 8, 2011

End of my challenge, Wedding Dreams Magazine, and a great bridal session

Yeah, so I pretty much have given up on my 30 day challenge for now. I was going strong for about 17 days, but then I ran into some issues. For those of you who don't know, my wife is pregnant, and she had some medical issues last week. I ended up spending two nights in the hospital and three afternoons, leaving me with very little time for photography.

On an exciting note, I just received my copies of Wedding Dreams Magazine. Through a random email, I was able to send some work into the magazine and ended up getting probably 10 or more photos in the magazine!

Last Saturday, I got the chance to shoot bridal portraits in a brand new location. We met with Misti at Lacuna Modern Furniture and got some great photos. Unfortunately, I still have about two months till their wedding so I can't post any yet.

Wednesday, February 23, 2011

30 Day Challenge: Day 17 Back to Photoshop

I've gotten off the everyday track, but I'm still shooting for a total of 30 days. Life has been pretty busy lately, and I just haven't had the time to work on something every single day.

Today, I went back to photoshop because it's the program I use more than anything. I had fun playing with After Affects, but truthfully, I won't use it very often. I decided to mess around with a maternity photo of my wife. Since she is such an angel, I decided to make her into...an angel.
All I really did with this photo was mess around with brushes. I found a set of wing brushes and used it to create the two wings. I know it's not that realistic looking, but it's more of a mystical look than realistic. I used a soft brush to create directional beams. You have to look closely to see them, but they are there. The last thing I did was mess around with the scattering effect on brushes. I cranked it up, so the brush scattered all the spots. I don't really like the positioning of all of them. I think I would rather have smaller dots and less of them. They stick out too much as is.

Photography wise, I have Misti's bridal portraits coming up. It's going to be awesome. We're going to go to Lacuna Modern Interiors and using some of their fabulous furniture, and I'm going to play with my new Cheetah softbox.

Sunday, February 20, 2011

30 Day Challenge: Day 16

It's very hard to know if a tutorial is worth your time before you start it. Unfortunately, I have run into several that were a waste. The first two for After Effects didn't work, and the one I just finished didn't really teach me anything useful.

The tutorial focused on writing expressions to control movement. These expressions are pretty much complex/wordy instructions for the program. If I didn't have the guy telling me what to type, I would have been completely lost, which is the first problem. I don't think I will be able to transfer these skills/knowledge to a new project. The second real problem I see with this is that I could have accomplished the same end product in a much quicker way. It might not have been as mathematically correct, but it still would have worked. I could have used position and keyframes to create a dropping action without any coding.

Friday, February 18, 2011

30 Day Challenge: Day 17

I'm not too happy about my progress the past 3-4 days. I've tried now two tutorials and wasn't able to finish either one. The first one, I don't think was my fault because I didn't have the right effects installed. The second one wasn't very well produced. The narrator didn't really explain what he was doing. Anyway, I still learned a few things from both, so it's not a complete waste. Today, I started a new tutorial, and this will probably be the last one I do for After Effects. I'm going to create a falling, bouncing effect. So far, I've learned that you can actually use mathmatical equations in the program to create some effects. We messed around with sin, cosin, and absolute value so far.

Wednesday, February 16, 2011

30 Day Challenge: Day 15 After Effects flop

I'm a little angry today. First, I thought I had fixed my problem with the missing effect for the tutorial. Then I found out that the effect I was missing isn't available in the trial version, so I pretty much wasted yesterday.

Today, I started a new tutorial in After Effects. It looked interesting. I would make a laser that would cut out a word. Unfortunately, after messing with it for 30 minutes, my preview did not work. I managed to get the laser to follow the path of the words, but the timing was off and the laser wasn't positioned over the words.

I'm not sure if I will continue with this tutorial tomorrow or give up and try a different one; I might even just give up on After Effects and go back to photoshop. That's how irritated I am.

Tuesday, February 15, 2011

30 Day Challenge: Day 14 After Effects plug ins

I didn't get much accomplished today, but I did find out something that I think will be beneficial in the future.

I'm still working with After Effects, mainly because I find it interesting, for the next few days. I found another tutorial. This one involves making a video with an alien ship! Well, first off, it's very difficult to understand the guy with his accent, so I spent most of my time rewinding and trying to interpret him. At one point, he tells me apply this effect and I watch him scroll to it. I did the exact same thing, except I didn't have that effect. I started getting frustrated, but then I went to my problem solver: google. After a google search I found that this effect is a free download. Not only did I find that effect, I also learned that there are a ton of free effects out there, jackpot!

Even though I didn't accomplish much, I think the effects are well worth my time and frustration with the guy.

Sunday, February 13, 2011

30 Day Challenge: Day 13 Final Product


Today I finished the last section of the video. The cool thing about this section, and this program in general, is that the video was created from 4-5 separate pictures in photoshop. The sky, clouds, grass, pole, and blades were all different images/layers in photoshop. Then, in after effects, I was able to create a video by adding motion to the each image. Many of the items popped up on the screen. That was simply moving the image. The best effect is the windmills. To create the spinning motion, all I had to do was add rotation to the blades. Since the blades were an image by themselves, they were the only thing affected by the spin effect.


Here is the final product. It took me three days to follow all of the tutorials, but I really am excited about the possibilities that are now open to me. I've got all these crazy ideas for videos and projects that I could make. Yes, there are several things about this I'm not completely excited about. The videos in it are random. I didn't choose them. I simply used what I was given in the tutorial. The same thing goes with the music. My next After Effects project will be completely my creation: my own video, images, and ideas.

30 Day Challenge: Day 12 After effects part 2

Today, I worked on the video again. I went through at least two more tutorials, which took about an hour and a half. I finished the last two of the videos. I didn't really do anything special involving text on the videos, but I did learn some cool ways to transition.

On one part of the video, I learned how to use masks, which works exactly like it does in photoshop. You can hide one part of a video and only show another. Well, with this technique, I sliced the video into 4 different segments, and had each segment move onto the screen at different times. This created a kind of sliding door effect.

In another video, I learned that I could make items rotate. The video has a bike tire spinning, and my text spins with the tire at the same speed.

I should have the final video finished next time.

Friday, February 11, 2011

30 Day Challenge: Day 11 After Effects

Well, Adobe threw a wrench into my plans. I had planned on downloading the trial version of Encore and using it to make a DVD menu today, but for some strange reason, they will allow you to try many of their products, but Encore is not one of them.

It's ok because I did get to mess around with a new program: Adobe After Effects. From what I can tell, this is a video editing program. From what I read/heard, it is used to make commercials, intros to DVDs, and many other things.

I started working on a video that hopefully I will be able to finish tomorrow. So far, I have watched over an hour of tutorial on it. I think I still have over 2 hours left! Anyway, the program allows you to mix video together and add effects to multiple things. I have made two scenes and both of the scenes had a video running on the background and then text scrolled across the screen. It doesn't sound very crazy but think about all the commercials that have something like this.

Once I finish the basic video, I plan on going back and making my own intro/commercial for Striegler Photography. It's gotten my pretty excited. This program has really opened some creative possibilities for me.

Thursday, February 10, 2011

30 Day Challenge: Day 10 DVD Menu

There is so much out there in Adobe world, and I only know the slightest hint of what all the programs can do. I'm working on a few new programs for the next few days: Encore and After Effects. Both of these programs are for creating video effects and DVDs. I'm sure they do much more than that, but that's all I plan on using them for.

For today, I am working with Photoshop for Encore. Sounds weird, but yes it's true. I'm going to be using Encore to create a DVD menu, but first I have to start off in Photoshop. The cool thing is that I can create the menu file in Photoshop and transfer it over to Encore to create it. In photoshop, I created a background and an image like I would normally do. Then, I created groups for each DVD menu item. Within that group, I created the text for the button and the spot for a video preview. The cool thing about using both programs together is I can use special text to name each layer. When I upload it to Encore, Encore will read the text and know what each layer is. For example, when I put (+) in front of the name of a group, it tells Encore that everything in the group is part of a menu item.

I pretty much set everything up in photoshop and tomorrow, I will use Encore to create the actual menu and link the buttons to videos.

Wednesday, February 9, 2011

30 Day Challenge: Day 9

The final product turned out better than I thought it would. I did so many different things to the picture and that background that it looked like a jumbled mess. There were motion streaks, different colored stripes, smoke, an image texture, and some other highlights/shadows.

The last few steps brought it all together. I added about 3 layers, each full of a single color. Then, I adjusted their fill and blend mode to give the whole image a create look. It made all of the different elements of the photo blend together. Before, when they were all different colors, they stuck out; the layers fixed that problem.

Well, no school for me tomorrow, so maybe I will actually play around with that other program like had planned. Maybe I'll make a nice DVD menu. Who knows.

Tuesday, February 8, 2011

30 Day challenge:Day 8

So...I wasn't able to complete a project today, but I did start on one. I got home late today, so there wasn't a bunch of time to work. I also picked a super complicated/multi-step tutorial to work on.

So far, I have adjusted the tint/color of the photo, created a motion streaked background, and blended in some brush strokes. I really have no idea if this one is going to turn out. Right now it doesn't look right. Hopefully, it will make a miraculous turnaround in a few steps.

Tomorrow, I will post the finish product.

Monday, February 7, 2011

30 day challenge: Day 7 Mixing the text with the photo


I'm not very satisfied with today's product. My plans were to mix the text that I created with the photo from yesterday. I accomplished this, but I don't think it is anything special. Maybe in the future I will come back and redo it.

First, I decided to mess around with the photo. I changed it to black and white to create a more dramatic look and because I felt the text was better with a black and white photo.

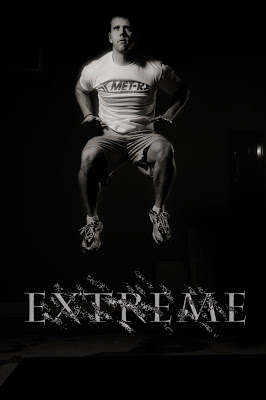
I wasn't sure exactly where to place the text. I moved it around quite a bit until I decided to go with the edge of the mat. I wanted to put it in the air, but there was no space above my head. I thought it looked fine on the bottom, but I didn't want it to block the floor and how high I was jumping. I think it's ok where it is.

My biggest problem is how the two interact with each other. They don't really do anything; they don't blend or do anything fun. All I did was a layer mask to blend part of the text out. I'm thinking in the future I might rotate the word and make it more 3D.

Tomorrow I'm thinking about messing with a different program. There's some video editing software I've never played with. It could be pretty cool.

Sunday, February 6, 2011

30 day challenge: Day 6 Jump Knee tuck


Today, I shot the second part of my project. Yesterday, I made the text for the project and today I'm making the content. I decided to go with something near and dear to my heart: P90x. I decided to capture one of the high flying moves from the program.

I got the idea from watching some lighting videos of Joe McNally. He had this amazing athlete flying through the air, and he was getting some great shots. I attempted the same thing except I didn't have an amazing athlete, just me.

I set up all of the lighting gear and had my amazing wife take the shots. I used my DIY softbox as the key light, firing from camera left. Then, I had a bare flash as a kicker coming in from behind me from camera right. The kicker light was gelled red and had a home made flag to keep the light from creating flare.

After shooting, I didn't do much editing. The only real change was darkening the background so I would stick out more. I was really trying to create a dark image like they use on many of the P90x DVDs. I didn't quite get enough drastic change from dark to light, but I'm still happy with a 10 minute shoot.


Saturday, February 5, 2011

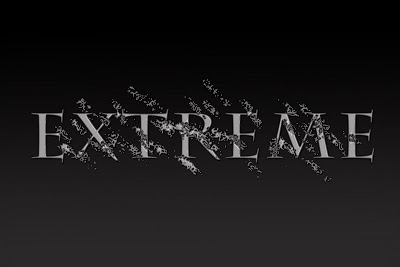
30 day challenge: Day 5 Extreme Text!


I've never really gotten into any type of editing and designing that isn't directly related to photography. I've never really messed with any kind of graphic design. Today, I played around with making text for a two day project.

The project is going to have an exercise theme, so, of course, I went with a word that describes my favorite workout program: Extreme.

For the background, I had a plain black that I shaded to grey using a regular gradient. I then added a motion blur to create some lines in it. I played around with fonts for awhile, trying to find one that really fit my concept. I wasn't super happy with what I got. My font selection is pretty pathetic. I did go online and find some pretty sweet ones for future use though. On a new layer, I added random spots with a regular brush. From those spots, I added texture by using a textured image and a distortion map. It's hard to explain how this really worked, but it pretty much took the textured image and streaked it through the spots I made.


The last thing I did was add some style layers to the texture and the word. It created a 3d look on the texture, making it jump out more. With the text, I simply added a stroke a bevel around it to give the word some depth.

It's nothing amazing, but hopefully, it will look pretty sweet with the photo I have planned for tomorrow.

Friday, February 4, 2011

30 day challenge: Day 4

For today, I went back and found a senior picture of Corey to mess with. I experimented with several different things, so it was a fun day.

First, I made a background by adding circular gradients, creating a gray circle slowly transitioning into the black. I added several of these, so the background appears more gray than black.

Next, I added Corey's photo and masked out the background. After that, I used an adjustment layer to darken the image and add more contrast.


The next part was probably the most useful. In photoshop, there are custom shapes. When I looked at them, there were only about 15. Then, I loaded all of them. Now I have the option of adding all types of shapes to my image. The shape I used was called Registration Target 2. It pretty much created a circular pattern where rays came off from the center. I put that directly behind Corey and masked out several parts of it.

Another beneficial thing from this was the brushes I downloaded. I got some pretty sweet grunge brushes and spray paint. I used this to add some grunge around the edges of the photo. The last two steps were pretty easy: added a gradient map to drop the colors but to add contrast and a hue saturation layer to give the whole photo a color.

Tomorrow, I'm starting a little project, and the first part will actually be text related and not photos, something I really don't have much experience with. It should be a fun process.

Thursday, February 3, 2011

30 day challenge: Day 3

Today, I did decide to work with photoshop. I followed a tutorial that I found on the internet. I started by making the background using a texture. I added blur to create a smooth transition from one part to the next. I then added noise to give it back some texture.

After finishing the background, I added a photo layer. I wanted the image to blend in and didn't want to see the image's background, so I used a layer mask to hide the background. After that, I pretty much just added a hue saturation layer to give it the bluish color.


The tutorial added another image and some text. I did this at first, but then I decided it was kind of lame, so I dropped it. This left a black spot on the right, but I thought it look decent the way it was.

Wednesday, February 2, 2011

30 day challenge: Day 2 Illustrator poster

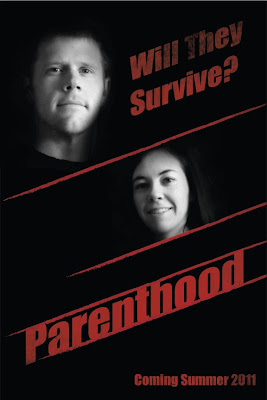
Day two and I'm already going off a little bit from my original idea. I said I would be learning photoshop, but I decided to try Illustrator. I found an interesting tutorial and decided to go with it. I really don't know much about Illustrator and have used it maybe twice, so this was a good opportunity for me.

First of all, the poster I created is supposed to be funny, not serious. Please don't think that I have negative feelings about parenthood. It's not that at all. I was just following along with the tutorial and there poster was an action film, so I needed an idea that would create suspense. That's what I came up with.


Anyway, I learned how to create skewed image holders and insert images into these frames. I also learned how to create lines and add brush strokes to them. The coolest part was adding a texture to the text through a mask. The original text was just plain red, but then I found a texture image and applied it to the words. Neat stuff.

I could have done the same thing in photoshop, but it would have been done differently and then I wouldn't have had a chance to experiment with a new program.

Tuesday, February 1, 2011

30 day challenge: Day 1 Fireball


I've decided to spend the next 30 days learning and improving my photoshop skills. I think I'm pretty decent at using photoshop for editing photos for weddings, but there is so much more out there on the creative side that I have never touched. Photoshop is such a powerful program and I'm only using the smallest of its capabilities. This will be my chance to expand my horizon, tap into my creative side, and hopefully, become an overall better photographer.

For my first day, I went with something I've always loved: superheroes. The thought of having special powers has always intrigued me. I use to just sit around and daydream about it when I was little. Today, the dream comes a reality. I am going to master a fireball!!!

Ashley was kind enough to take the photo for me once I had all the lights set up. it was a pretty easy, two light setup. I had one flash sitting on a chair in front of me aiming at my face. I used a homemade straw grid to keep the beam of light narrow. Then, I had a second flash set off to the side to illuminate some of my body and the side of my head. If I would have thought about it more, I would have put it on the side of the fireball, so the shadows would look more realistic, but I didn't. The second flash was flagged so the light wouldn't spill onto the background.

In general with editing, I used a stock photo of fire and erased and manipulated it to fit and flow from my hand. I then added hue/saturation adjustments to my hand to create a colored glow. I also created a brightness adjustment and hue saturation for the side of my face to make it look like the fire was lighting my face.

Overall, I am pretty happy with the results. I got some more experience playing around with masks and adjustment layers, and got to see an idea come from my brain and onto the screen.

Monday, January 17, 2011

Chris and Rachel's Wedding

For some reason, I always really enjoy winter weddings. They all seem to be really special. I think it's partially because it's a different time period than most weddings, and it's also Christmas time!

Meeting Rachel and Chris is actually a pretty cool story. We were shooting one of their friend's wedding and Rachel caught the bouquet. Of course, the idea behind that is the person to catch it will be the next person married. Soon after, Chris proposed!

Our experience with the two was just amazing. We did Rachel's bridals at Pratt Place, which is a hidden jewel near campus. I have lived in Fayetteville almost my entire life, and I had no clue the place even existed. It was gorgeous.

The wedding was equally amazing. There was a beautiful ceremony, followed by a trolley ride to a country club. The band was rocking and they even cut the cake with a real sword...a guy's dream.